Handheld 2.5 User Guide
Mobile guide: configure Handheld 2.5 device, use bar and table service, ordering, checkout, splits, and troubleshooting.
Overview
This article describes how to configure a Genius location to use Genius for Restaurant’s Handheld 2.5 POS payment device. It also describes how to perform various tasks and transactions with the device after it is configured.
Enabling a Location to Use Handheld 2.5
Before a location can use the Handheld 2.5 device, you must enable the location to use it in the Admin Console.
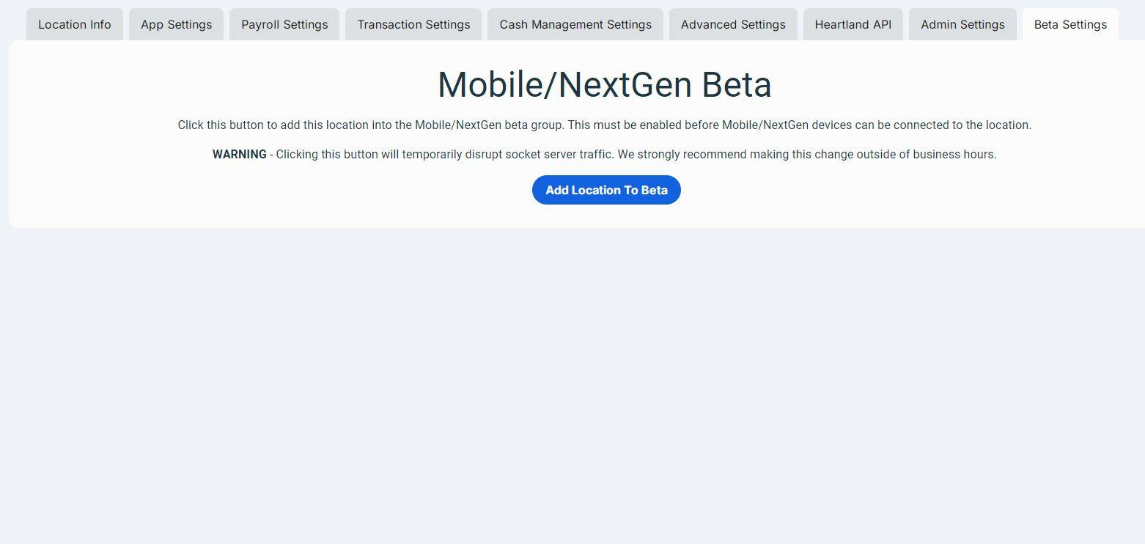

- Log into the Admin Console, and access the appropriate account and location.
- In the Admin Console’s Main Menu, click Location Setup.
- In the Location Settings screen, click the Beta Settings tab.
- In the Beta Settings tab, click Add Location to Beta.
- Click Save to save your settings, then click Publish Changes.
Once enabled, you must "force" close and restart the Genius POS app on all devices on the network. This will reset their socket connections and avoid performance disruptions.
Configuring the Handheld 2.5 device
Your new Handheld 2.5 device will arrive preassembled, with the Genius for Restaurants POS app already installed. Before logging into Genius POS, we recommend you modify the device’s default settings for battery management and display size.
Box contents
You should have received the following contents.
- Handheld point-of-sale device
- Hand strap (attached)
- Reader and case (attached)
- Power cable and charger
- Charging cradle
Powering the device
Press and hold the Power button (on the left side of the device) for about five seconds, or until it displays the Powered by Android loading screen. Once the device powers up, it will display its lock screen.
The device can then be charged directly with the included power cable or by connecting it to the charging cradle.
Connecting to the location’s Wi-Fi network
Before installing any apps on the device, you must connect it to the location’s Wi-Fi network.
- After unboxing the device, turn it on.
- Swipe up from the bottom of the screen, then tap the Home button.
- On the Home screen, tap the Settings icon.
- In the Settings app, tap Network & Internet.
- Tap Internet.
- Select the Wi-Fi network that the device will use.
- In the Password box, enter the network’s password.
- Tap Connect.
The device should now be connected to the location’s Wi-Fi network.
Configure the Handheld 2.5’s Pogo Pin setting
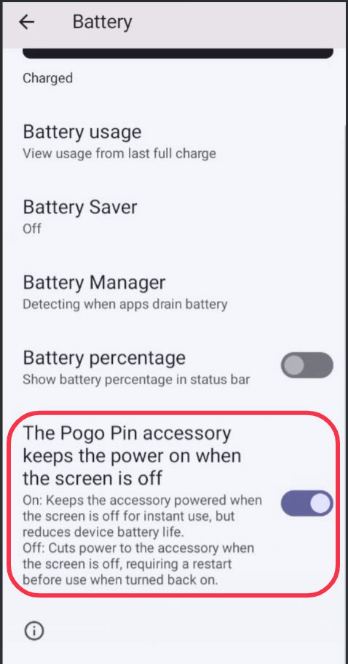
- On the device’s Home screen, tap the Settings icon.
- In the Settings app, tap Battery.
- In the Battery screen, enable the Pogo Pin accessory setting.
Configure the Handheld 2.5’s Display Size settings
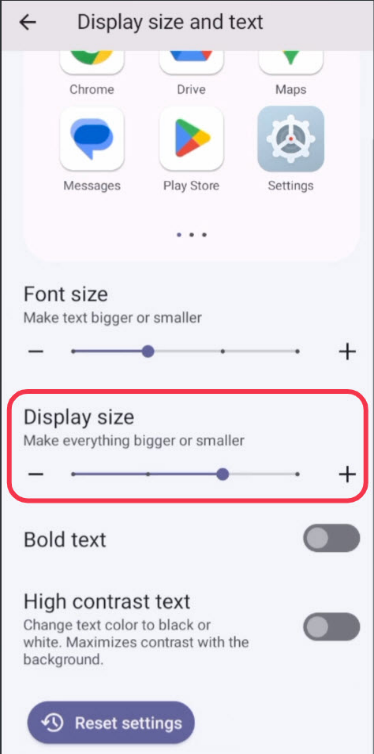
- On the device’s Home screen, tap the Settings icon.
- In the Settings app, tap Display size and text. In the Display size and text screen, the Display size slider has four options.
- Slide the Display size slider from the 2nd option (from the left) to the 3rd option.
Logging into the Genius for Restaurants POS
Your new Handheld 2.5 device will have the Genius for Restaurants POS app already installed.
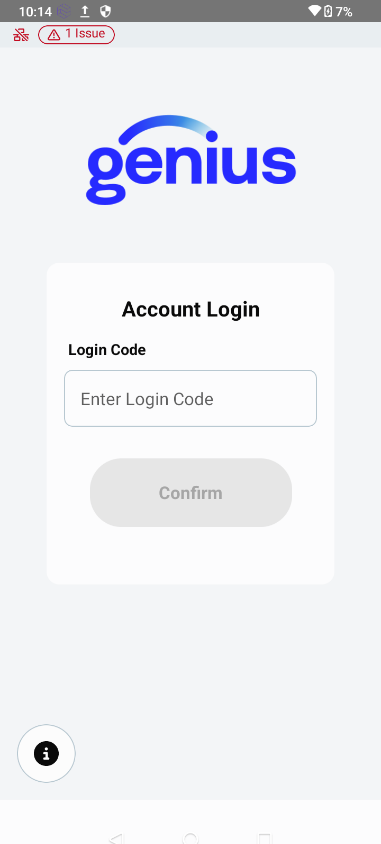

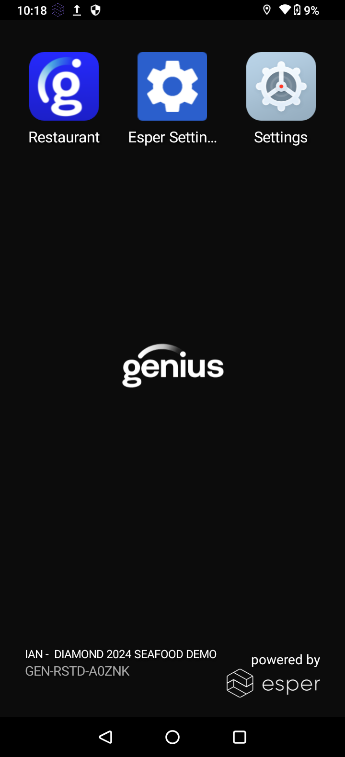
- On the device's Home screen, tap the Restaurant icon.The Genius for Restaurants POS app will run and prompt you for an Account Login Code.
- Enter a valid Account Login Code, then tap Confirm.If you do not already have a valid Account Login Code for the location, you can acquire one in the Admin Portal. For detailed instructions on acquiring an Account Login Code, review our “Multi-Factor Authentication User Guide“.After you enter an Account Login Code, the POS will prompt you to enter a name for the device.
- In the Device Name box, enter a unique, descriptive name for the device (such as “Handheld 1” or “Patio Handheld”), then tap Save.
You are now logged in and ready to use the Genius POS.
Using the POS (Basic Tasks)
The following sections describe the environment and features within the Handheld 2.5 POS, as well as how to perform basic tasks and transactions, such as opening new tickets, ordering items, splitting tickets, and other actions.
Room Screen
When you log into the POS, it displays the Room screen. In this screen, you can select a room and then access, review, or add tickets in that room. When you first log in, the POS accesses the first room in the Rooms list by default and displays it and its tickets (if any are currently open).
Regardless of the type of room you are viewing, the Room screen always includes the following controls in its Header panel.
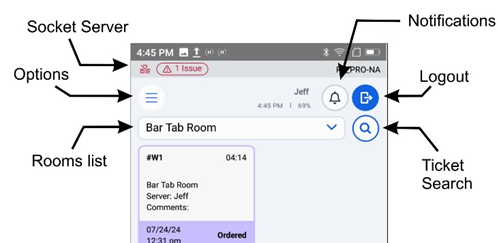
Socket Server: This icon displays the current connection status of the POS with the socket server.
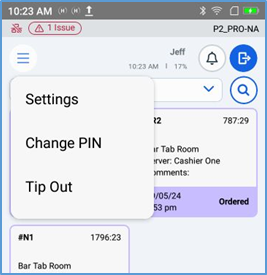
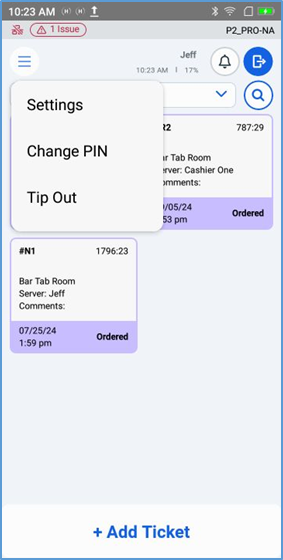
Options: This button opens the Options menu, enabling you to access the Settings screen, the Change PIN screen, and the Tip Out screen.
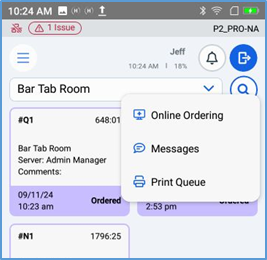
Notifications: This button displays a menu, providing access to the Online Ordering screen, the Messages screen, and the Print Queue.
Logout: This button immediately logs you out of the POS.
Ticket Search: This button accesses the Ticket Search screen, with various options for searching for tickets, such as assigned server, room, and so on.
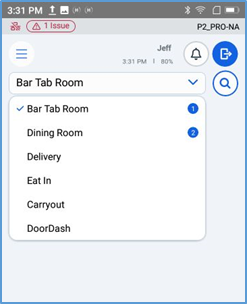
Rooms: This list enables you to access a different room in the Room screen. To access a different room, click the Rooms list and select another room.
Regardless of the type of room you are viewing, the POS will always display the ticket tiles in the Room screen as highlighted by a color that indicates its current status:

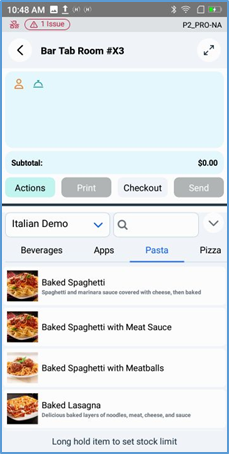
Room Screen: Bar Service
In the Room screen, if you access a room that uses tabs, the POS displays the room without a table layout. Instead, it lists all occupied tables in the room as a list of tiles, each displaying the table’s number, status, current server, the time it was opened, and the amount of time it’s been occupied.
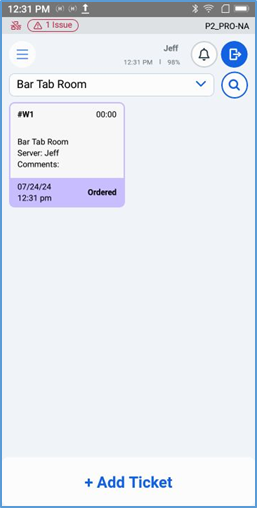
To open a ticket in a room with tabs, tap +Add Ticket at the bottom of the screen.
Room Screen: Table Service
If you access a room that uses table layouts, the Room screen includes two additional buttons in the Header panel, Map View and List View. These buttons enable you to view the room with or without its table layout.
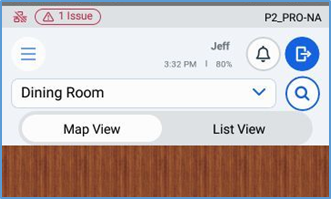
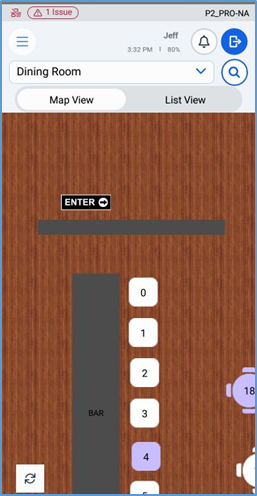
If you tap Map View, the POS displays the room’s table layout, with icons representing its available tables. In this view, tables with open tickets display as highlighted. If you tap List View, the POS displays the room’s available tables as a list of tiles, each displaying the table’s number. Again, tables with open tickets display as highlighted.
Map View
List View
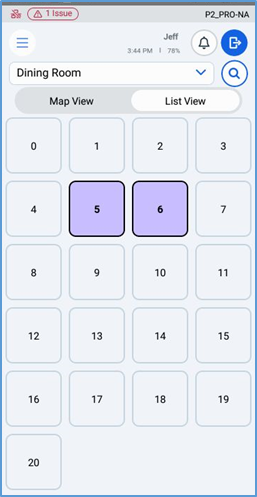
To open a ticket in a room with a table layout, tap the icon or tile of an unoccupied table.
Ticket Screen
When you add a new ticket to a room, regardless of the room type, the POS opens a new ticket and displays the Ticket screen, listing the contents of the ticket. Within this screen, you can add, edit, or void items in the ticket, as well as perform other necessary actions.
Modifying the Ticket View
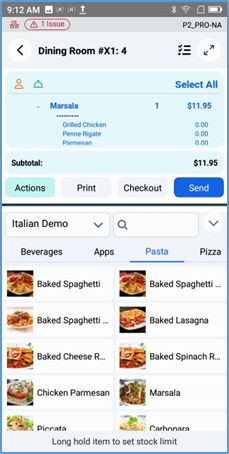
You can view the Ticket screen in one of two modes, Menu View and Expanded View. By default, the POS opens the Ticket screen in Menu View, but you can change the screen’s view mode by tapping the View button in the Header panel (beside the ticket number).


This button enables you to toggle the view mode between Menu View and Expanded View.
Menu View
Expanded View
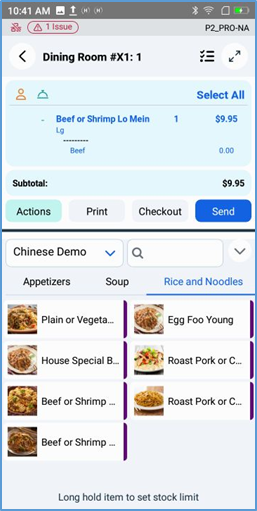
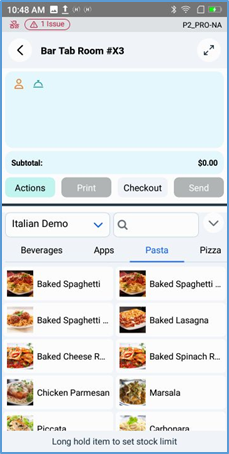
In Menu View, the POS displays the ticket in the top half of the screen and the item menu in the bottom half of the screen. In this mode, you can navigate the menu and add items, while still viewing the ticket. If necessary, you can scroll the ticket display up or down to review any obstructed areas of the ticket.
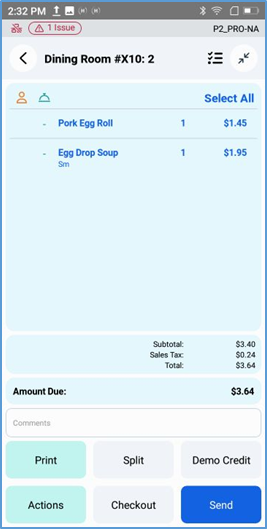
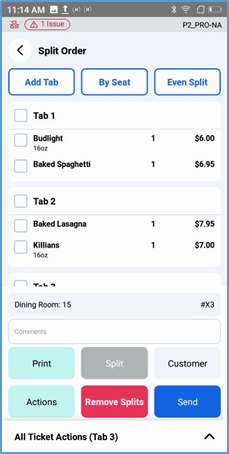
In a thin panel below the ticket display, the POS displays the ticket’s current amount due. It also displays buttons for certain critical actions (Print, Checkout, and Send), but you must tap Actions to access most action options.
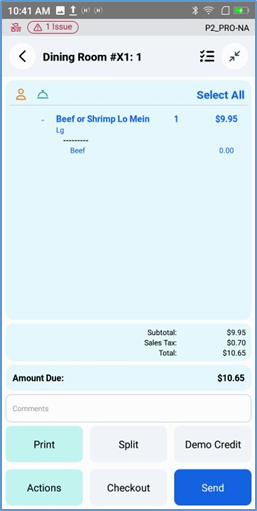
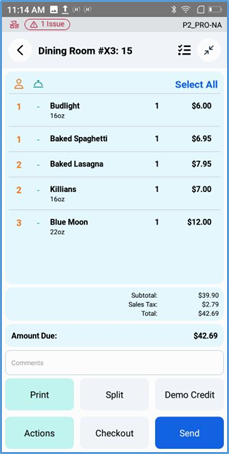
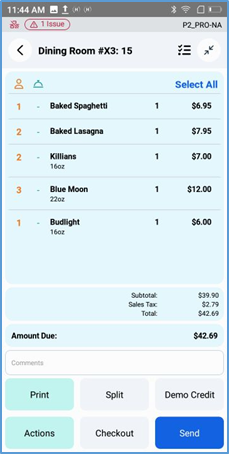
In Expanded View, the POS hides the item menu and displays the ticket in an expanded panel. In this view, the Ticket panel displays such details as the subtotal, sales tax, and total. Again, the bottom panel includes buttons for certain actions (Print, Split, Customer, Checkout, and Send), but you can tap Actions to access additional action options.
Ordering Menu Items in the Ticket Screen
To add menu items to a ticket, access the ticket and display it in Menu View. As described above, in Menu View mode, the Ticket screen is divided between an upper Ticket panel and a lower Menu panel.
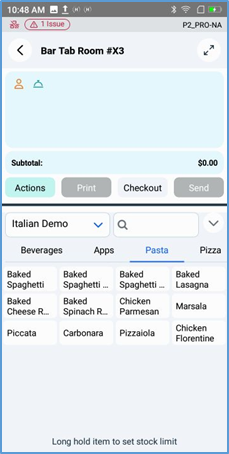
In the Menu panel, you can access the menu items in a specific menu group by selecting that group in the Menu Group list.
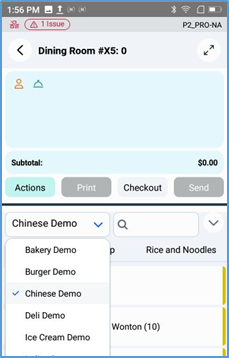
When you select a new menu group, the POS displays the menu sections associated with that group as tabs below the Group list. If you tap a section tab, the POS displays the menu items in that section. If the menu group includes more than four sections, you can scroll the section tabs left or right to access them.

In the Ticket screen, you can modify how the POS displays the item tiles in its menus. In the Header panel, if you tap , the POS displays a list of size options.
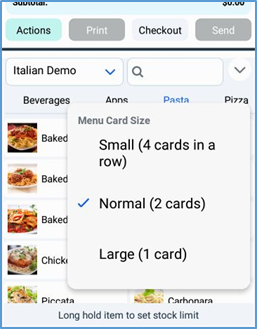
If you select Small, the POS will display its menu cards as small (four cards per row). If you select Normal, the POS will display its menu cards as medium size (two cards per row). If you select Large, the POS will display its menu cards as large enough to fill an entire row. Large cards display extra details about its item (if any are available).
Small
Normal
Large
Modifiers
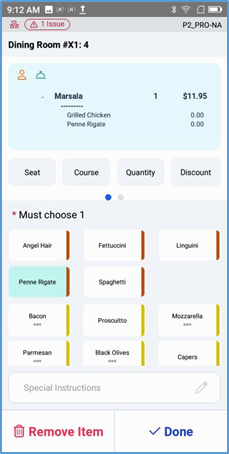
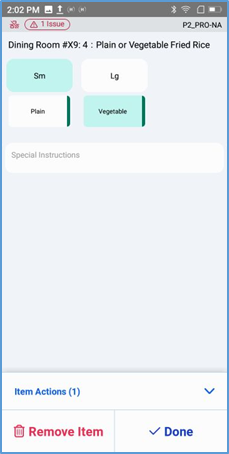
To add an item to a ticket, tap the item’s card. If the item has no modifiers, the POS adds it to the ticket. If the item does have modifiers, the POS displays the Modifiers panel in the bottom half of the screen.
If the item includes any required modifiers, they will display at the top the screen, highlighted in red. When you select a required modifier, the POS automatically scrolls down to the next required modifier selection (if there are any).
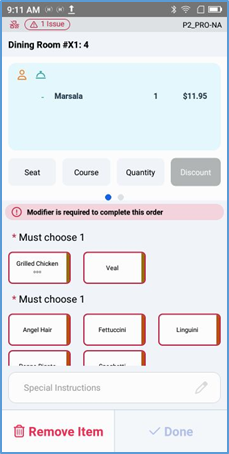
When you select a modifier, the POS highlights the selected button as light green.
After selecting all appropriate modifiers, tap Done to add the item to the ticket. Or, if necessary, you can remove the item and return the order screen by tapping Remove Item.
If you add the item to the ticket, the POS displays the new item in the Ticket screen in blue text, indicating that it has not yet been sent to the kitchen printers.
Item Actions
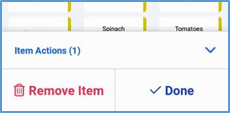
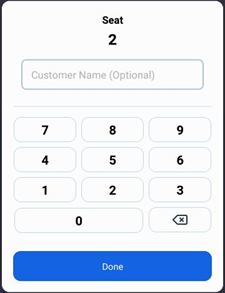
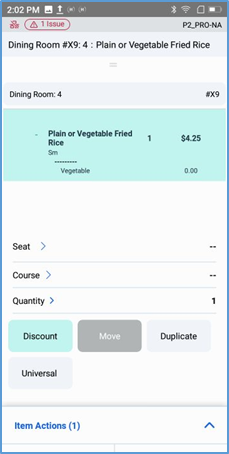
In any item’s modifier screen, if you tap Item Actions, the POS opens the Item Actions panel at the bottom of the screen. This panel includes a preview of the item as it will appear in the ticket, as well as controls to edit the item’s seat number and quantity.
While viewing the Modifiers panel, the Action buttons (Seat, Course, and so on) display in a scrollable row of buttons between the Ticket Preview panel and the Modifiers panel.
If you tap Seat, the POS displays the Seat keypad, enabling you to enter a seat number for the item. If necessary, you can also enter a name for the customer in this seat by typing a name in the Customer Name box.
If you tap Course, the POS displays the Course keypad, enabling you to apply a menu course number to the item.
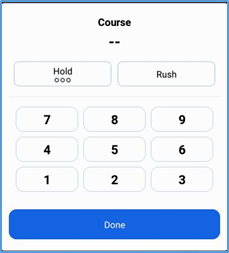
In the Course keypad, you can apply the Hold status to the item by tapping Hold, then tapping Done. You can also apply the Rush status to the item by tapping Rush, then tapping Done.
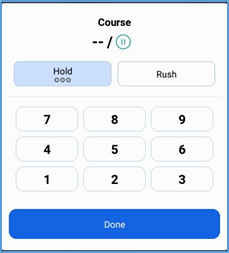
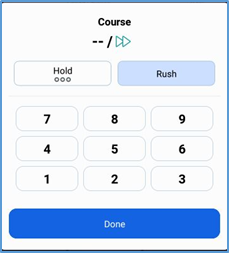
In the Ticket screen, the POS displays items in the Held and Rushed statuses with appropriate icons:
Held Item

Rushed Item

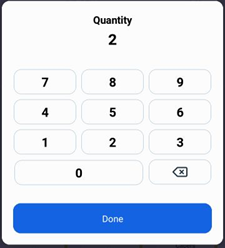
In the Modifiers panel, if you tap Quantity, the POS displays the Quantity keypad, enabling you to enter a new quantity for the item.
In the Modifiers panel, if you tap Discount, the POS will display the Item Discounts & Promo screen, which lists all discounts and promotions that can be applied to the ticket.

In the Modifiers panel, if you tap Move,
In the Modifiers panel, if you tap Duplicate, the POS will add a second order of the item, with identical modifiers, to the ticket.
You can close the panel by tapping Item Actions again. When you add the item to the ticket, the seat number and quantity will display with the item.
Item Actions Closed
Item Actions Open
Item Selection Screen
After adding items to a ticket, if you need to perform an item action on multiple items, you can do so in the Item Selection screen. In the Ticket screen, you can access the Item Selection screen by tapping the Selection button.

The Item Selection screen lists all of the items in the ticket, each with an adjacent check box. To select one or more items on the ticket, tap their respective check boxes.
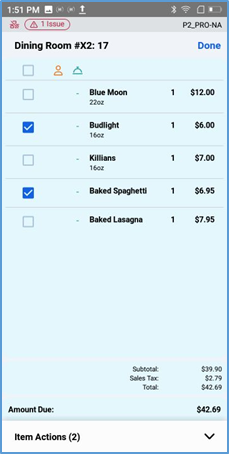
After selecting one or more menu items, tap Item Actions. The POS displays the Item Actions panel at the bottom of the screen.
The Item Actions panel includes controls that enable you to apply certain settings to menu items. As described above, you can apply a seat number or course number to your selected items by tapping Seat or Course, then entering an appropriate number in the Seat or Course keypads.
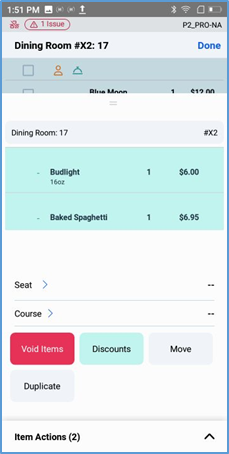
To void all selected items, tap Void Items, then select an appropriate void reason in the Reason for Void panel.
To apply a discount to all selected items, tap Discounts, then select the discount in the Item Discounts & Promo screen. To remove the discount from an item, select the item in the Item Selection screen, access the Item Actions panel again, then tap Remove Discounts.
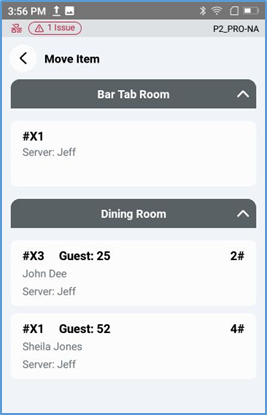
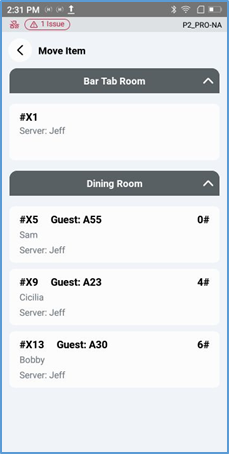
To move all selected items to another open ticket, tap Move, then select a ticket in the Move Item screen. The Move Item screen is divided into separate rooms, allowing you to move items to a ticket in any room the server can access.
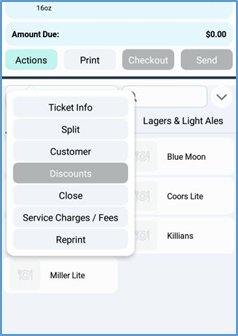
Ticket Actions
In the ticket display, the bottom panel includes buttons representing actions you can perform to modify or manage a ticket, such as Send, Print, or Checkout.
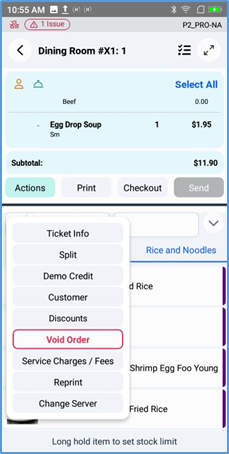
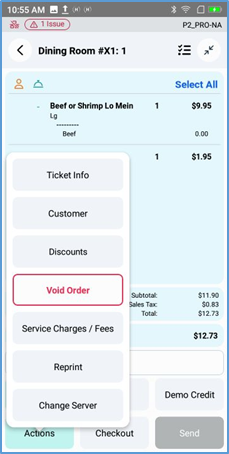
Most available actions are only accessible in the Actions menu. In the bottom panel, you can tap Actions to access a submenu with additional action options, such as Service Charges, Discounts, and Void Order.
Actions menu in Menu View
Actions menu in Expanded View
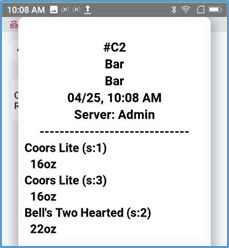
If you tap Print, the POS will send the ticket to the receipt printer.
Checkout
If you tap Checkout, the POS will access the Payment screen. In this screen, you can select an appropriate payment option to pay the check.
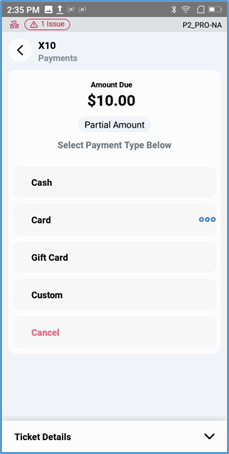
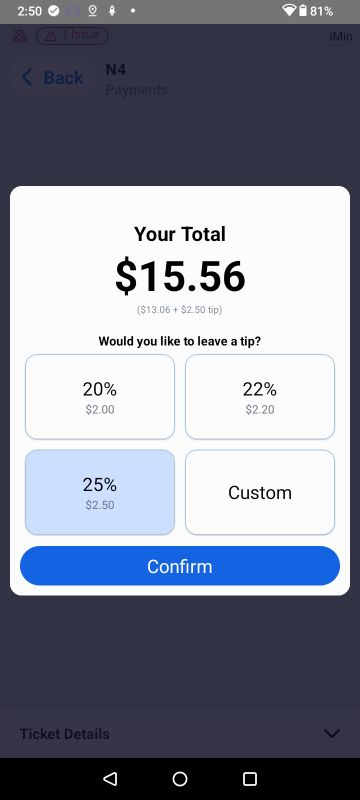
If the customer pays with a credit card, tap Card. The POS will prompt the customer to dip, tap, or swipe the card. After 30 seconds, if no action is taken, the POS will display the Cancel button, enabling you to close the prompt and cancel the payment.

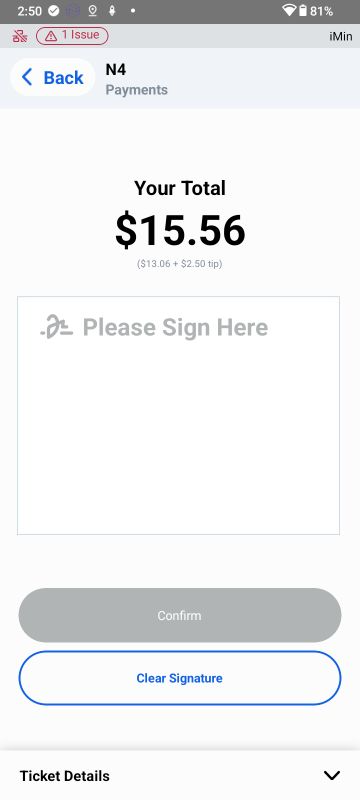
After inserting the card, the POS may prompt you to select or enter a tip amount. To enter a tip, tap the tile of an existing tip amount, or tap Custom and enter an amount, the tap Confirm.

After entering a tip amount, the POS may prompt you to enter a signature. If prompted, enter a signature in the Please Sign Here box, then tap Confirm.
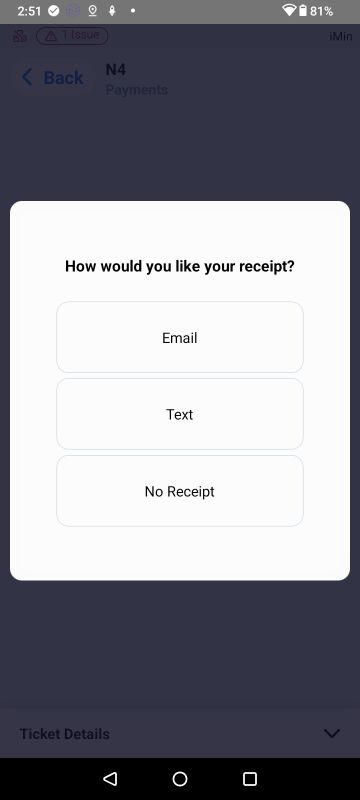
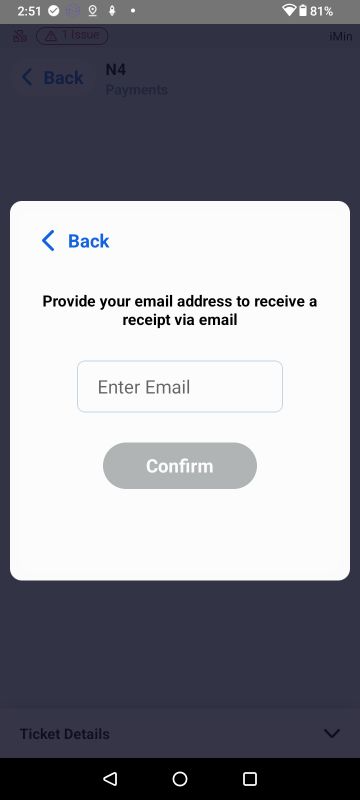
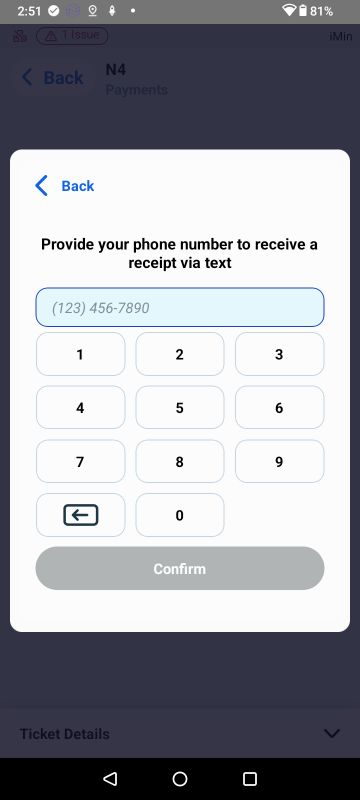
After entering a signature, the POS may prompt you to select a preferred format for the receipt, such as by Email or Text (SMS text message). If you select Email or Text, the POS may then prompt you to enter an appropriate email address or phone number, if it does not already have one saved in its customer records.
After selecting a preferred format for the receipt, the POS may then prompt you to select a rating for your dining experience. You may select an appropriate rating (one to five stars), then tap Confirm. Or you can tap Skip to proceed without entering a rating.

If the customer pays with cash and gives the exact amount of the ticket, tap Cash. The POS will automatically pay the ticket with cash for its total amount.
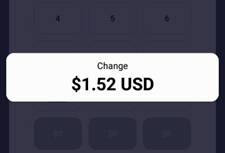
If the customer pays with cash and gives an amount greater than the ticket’s total, tap Partial Amount. The POS will display a keypad, enabling you to enter the amount of cash given.
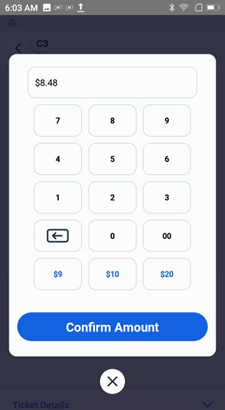
If you enter the given amount and tap Confirm Amount, or if you tap one of the suggested tender amounts, the POS will pay the ticket with cash and then display the total change due.
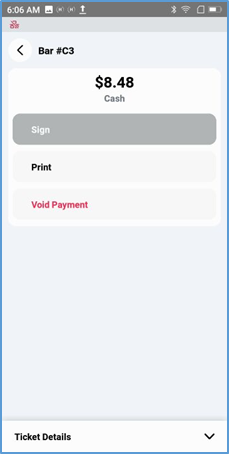
After applying a payment, if you need to print a receipt for the customer, tap Print. If you need to remove the payment, tap Void Payment.
If you tap Ticket Details, the POS will expand the bottom panel and display the contents of the check, with prices and totals. Tap Cancel to return to the Ticket screen.
Send
If you tap Send, the POS will send all ordered menu items on the ticket to the kitchen prep printers.
In the Ticket screen, items that have been ordered but not sent to the prep printers display in blue text. After an item is sent to the printers, it displays in black text.

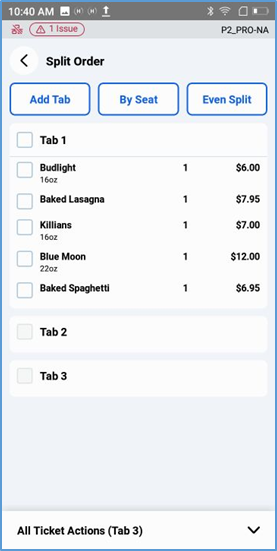
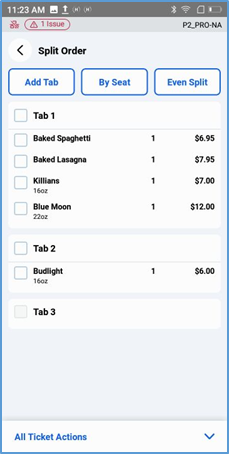
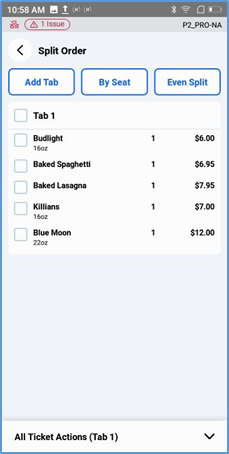
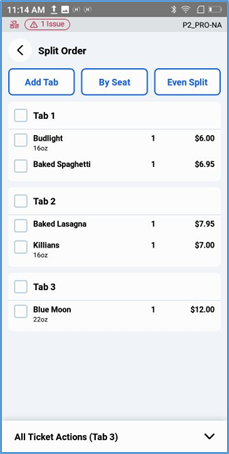
Split
If you tap Split, the POS will display the Split Ticket screen, which allows you to split the ticket in various ways. The options available are Add Tab, By Seat, or Even Split.

Add Tab
In the Split Order screen, if you tap Add Tab, the POS adds a new empty tab to the ticket. You can add as many tabs as are needed.
After adding a new tab, you can then move items from an existing tab to the new tab. If you tap an item, the POS displays multiple split options (Move to, Evenly, and Advanced). The POS also displays a list of buttons, each representing a tab, with the item’s current tab highlighted.
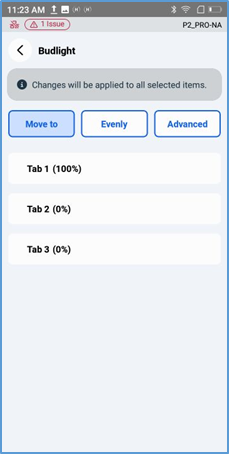
The Move to option enables you to move a whole item to a new tab. If you select Move to and then tap a tab button, the POS moves the item to the selected tab and displays the updated Ticket screen.
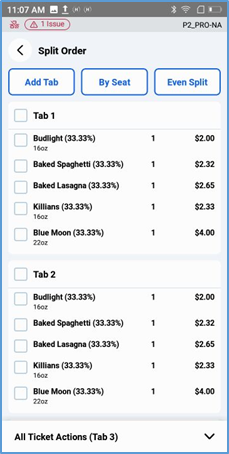
The Evenly option enables you to split a single item (and its cost) between two or more tabs. If you select Evenly and then tap one or more tab buttons, the POS splits the item between its current tab and the selected tabs.
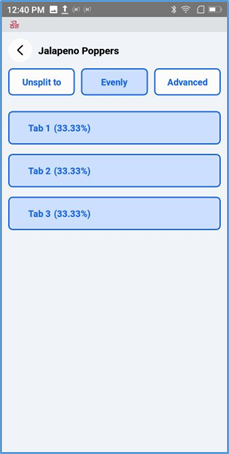
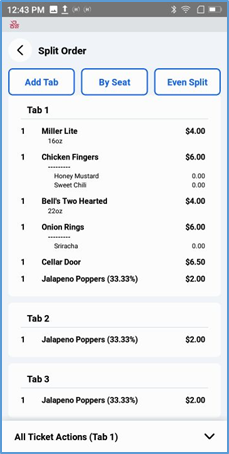
In the Ticket screen, the POS displays the item in each of its tabs, with the percentage of the cost per tab displayed with the item’s name. For instance, if you split an order of jalapeno poppers between three tabs, the POS will display it in each tab as “Jalapeno Poppers (33.33%)”.
By Seat
In the Split Order screen, if you tap By Seat, the POS creates a dedicated tab for each seat number on the ticket, and then moves all items to the tabs that correspond with their seat numbers.


This method only works if you have already assigned seat numbers to the items in the ticket.
Even Split
In the Split Order screen, if you tap Even Split, the POS displays a list of split numbers, each representing the number of splits you want to create within the ticket (2 Ways, 3 Ways, 4 Ways, and so on).
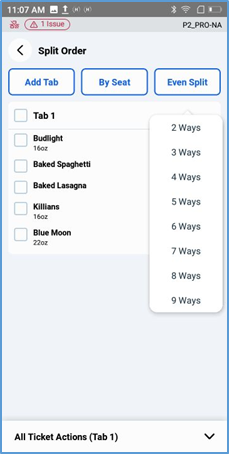
After selecting a split number, the POS adds new tabs equal to the number you selected, then splits every item in the ticket evenly between all tabs.
For instance, you may want to split a ticket with three customers on a single tab. Using the Split action, if you select Split Evenly, then select 3 Ways, the POS would split the one existing tab into three tabs, then split every item on the ticket between the three tabs.
Removing a Split
If, for whatever reason, you need to remove a split (of any kind) from a ticket, you may do so by accessing the ticket, expanding the bottom panel, then tapping Remove Splits. The POS will remove all splits from the ticket and display the Ticket screen.
Ticket Info
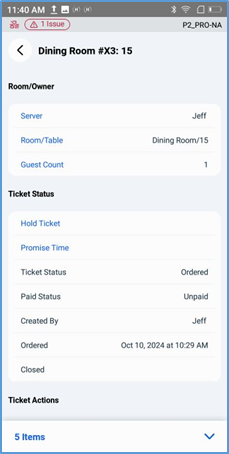
If you tap Ticket Info, the POS displays the Ticket Info screen, which features a list of information about the ticket, such as its server, its room and table number, its hold status, its payment, and so on.
Customer
In the Actions submenu, if you tap Customer, the POS displays the Customer Info screen. If the customer already has a record saved in the account’s data, this screen will display the customer’s name and contact information (name, phone number, email address, and so on).
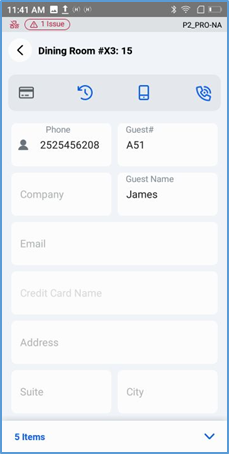
You can review the customer’s information, or if necessary you can add to or edit the customer’s information.
Discounts
In the Actions submenu, if you tap Discounts, the POS will display the Discounts & Promotions screen, which lists all discounts and promotions that can be applied to the ticket.
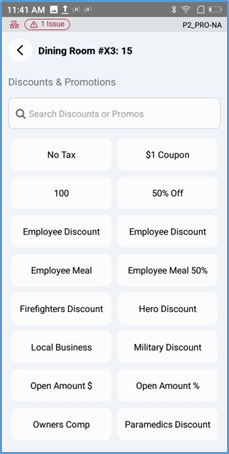
If you tap a discount option, the POS displays a keypad, enabling you to change the default amount of the discount.
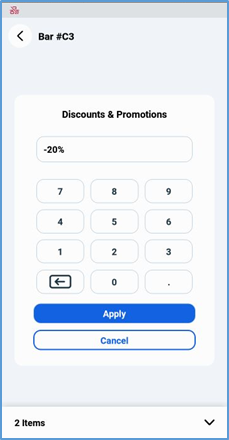
You can also add a description of the discount by entering the details in the Description box. Tap Apply to add the discount to the ticket. After you tap Apply, the POS displays the discount as a new item in the ticket and adjusts the ticket’s totals appropriately.

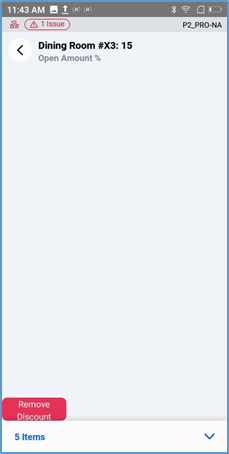
The POS displays the discount with blue text, like a menu item that has not yet been sent to the printer. To apply the discount to the ticket, tap Send.
Later, if you need to remove the discount, tap the discount in the Ticket screen, then tap Remove Discount.
Void Order
The Void Order action enables you to void an entire ticket. In the Actions submenu, if you tap Void Order, the POS will display the Reason for Void panel, which lists all predefined void reasons that can be applied to the ticket. You can also add a description of the void reason by entering the details in the Description box.
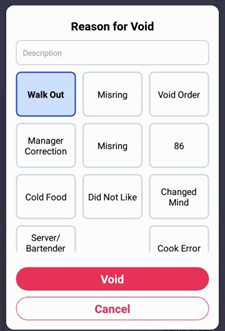
To void the ticket, tap an appropriate void reason, then tap Void. The POS will void the ticket and display the room’s Ticket screen, with the voided ticket’s table or tab icon now displaying as available.
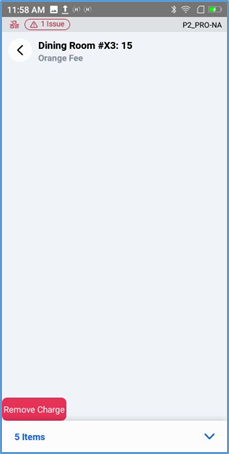
Service Charges/Fees
In the Actions submenu, if you tap Service Charges/Fees, the POS displays the Service Charges/Fees screen, which lists all charges that can be applied to the ticket.
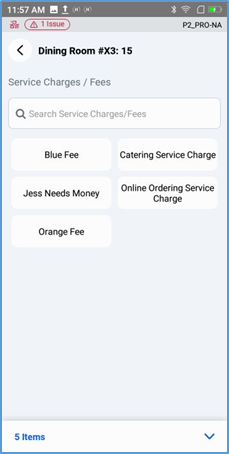
If you tap a charge option, the POS displays a keypad, enabling you to change the default amount of the charge.
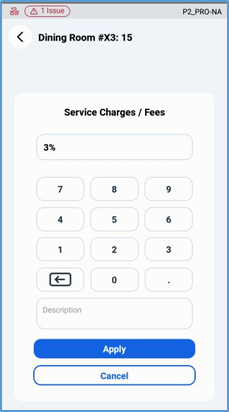
You can also add a description of the charge by entering the details in the Description box. Tap Apply to add the charge to the ticket. After you tap Apply, the POS displays the charge as a new item in the ticket and adjusts the ticket’s totals appropriately.
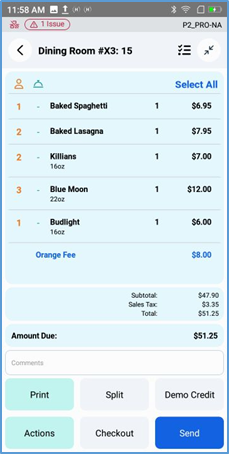
The POS displays the charge with blue text, like a menu item that has not yet been sent to the printer. To apply the charge to the ticket, tap Send.
Later, if you need to remove the charge, tap the charge in the Ticket screen, then tap Void Charge, then tap Send.

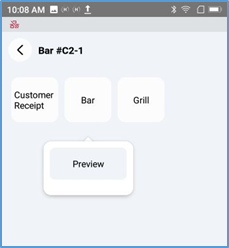
Reprint
The Reprint action enables you to reprint the ticket. In the Actions submenu, if you tap Reprint, the POS displays a screen listing buttons, each representing an available printer.
If you tap a printer button, the POS will send the ticket to the selected printer. If you press and hold a printer’s button, the POS will display the Preview option. If you then tap Preview, the POS displays a print preview of the ticket.
Change Server
The Change Server action enables you to assign the ticket to a different server. In the Actions submenu, if you tap Change Server, the POS displays a panel that includes the Server Name box, as well as buttons representing any servers that are currently clocked in.
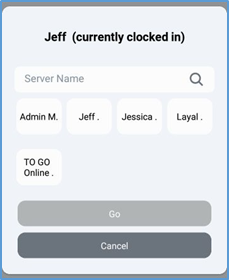
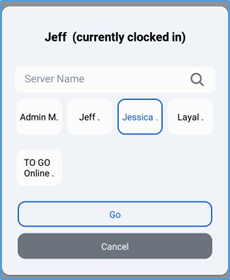
To assign the ticket to a new server, select an appropriate servers button, then tap Go. If you do not see a button representing the server you want to select, type the server's name in the Server Name box. If that server is clocked in, the POS will display the server as an option. Select the server, then tap Go.
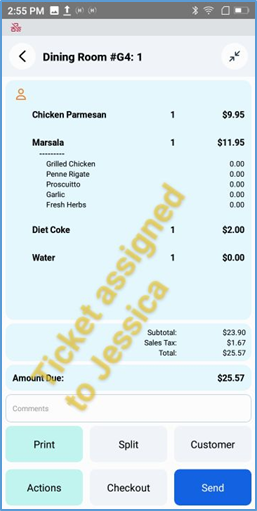
Afterwards, when you access this ticket, the POS will display banner text across the screen declaring that that ticket is assigned to the new server.
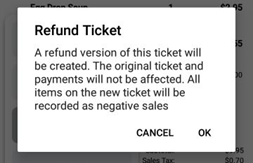
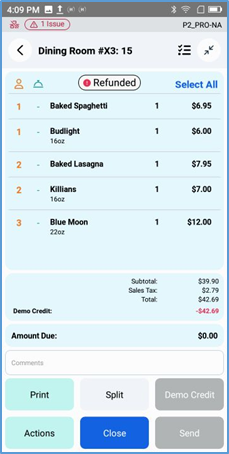
Refund
After you pay a ticket, the POS will include Refund as an action option. The Refund action enables you to refund the full amount of a ticket back to a customer, with various payment methods.

If you tap Refund, the POS displays a Refund Ticket prompt, describing how the POS will process the refund (by creating a refund version of the original ticket). Tap OK to continue.
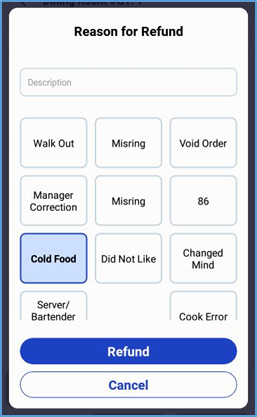
The POS then displays the Reason for Refund panel, allowing you to specify the reason for the refund. In this panel, select an existing reason option (if any are applicable), or type a more detailed reason in the Description box, then tap Refund.
The POS will then display a screen displaying the total refund amount and a list of payment options. In this screen, you may select an appropriate payment type to use for the refund.
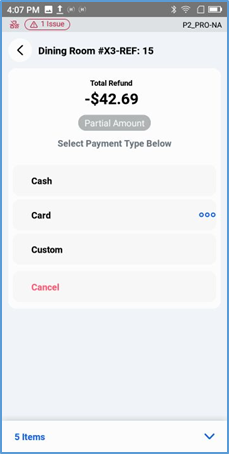
If necessary, you can tap Enter Amount to edit the default amount of the refund. Once the appropriate amount is set, tap the button of an appropriate payment type, such as Cash (if enabled for the location), Card, or Gift Card.
If you tap Custom, the POS will display a panel listing the location’s custom tenders as payment options. If you tap Cancel, the POS will cancel the Refund transaction and return to the Ticket screen.
Once you select a payment type, the POS processes the refund with the selected payment type, then displays a screen verifying its approval.
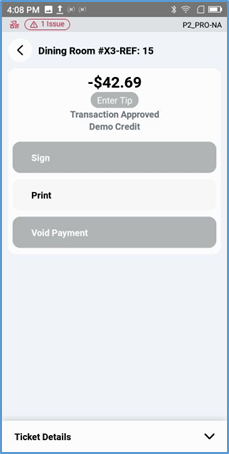
If the transaction requires a customer’s signature, you can tap Sign to access the signature panel, allowing the customer to add a signature. If you tap Print, the POS will prompt you to either preview the ticket or send it to a receipt printer. If the refund’s payment type supports the option, you can select Void Payment to void the payment.
If you access the ticket after performing a refund, the POS will display a Refunded banner in red text. In the Room screen, the POS will display the ticket as closed, its tile highlighted in orange.

Close
To remove a paid ticket from the Room screen, access the ticket. In the Ticket screen’s Actions menu, tap Close.
When you tap Close, the POS closes the ticket and removes it from the displayed tickets in the Room screen.
Ticket Search
In the Tickets screen, if you tap, the POS will access the Ticket Search screen, which features various controls to enable you to search for a ticket, regardless of its status.

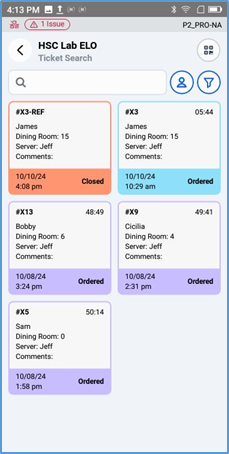
The Ticket Search screen lists the location’s most recent tickets. If you tap, the POS will filter the list to only include tickets associated with the server currently accessing the screen.

If you tap, the POS will display the Ticket Filters panel, which features controls that enable you to filter the list of tickets by one or more servers, ticket statuses, service areas, or payment types.

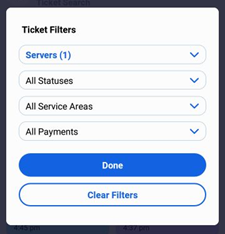
To apply a filter to the ticket list, select one or more search criteria in these lists, then tap Done. To clear all current filters, tap Clear Filters.
Settings Menu
To access the Settings menu, tap the Options button () in the POS Rooms screen, then tap Settings.

Info Screen
The Info screen displays a list of information about the POS running on this device.
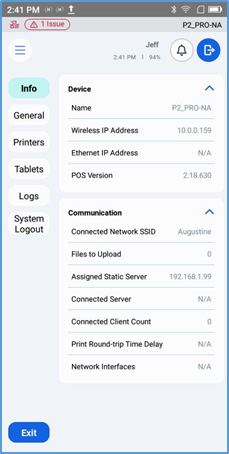
The Info screen is divided into the following sections, each listing different types of information:
Device: Technical information about the POS device itself, such as its name, IP addresses, and the POS app’s version number.
Communication: The device’s communication settings, such as its network SSID, connected servers and client counts (if any), and network interfaces.
Location: A list of features specific to the location, with flags indicating if each feature is or is not enabled at this location.
Rooms: A list of the rooms accessible to this POS. If you tap a room in this list, the POS displays a sublist of room-specific features, with flags indicating if each feature is or is not enabled in the room.
Job Types: A list of the job types available to this POS. If you tap a job type in this list, the POS displays a sublist of features specific to the job type, with flags indicating if each feature is or is not enabled for the job type.
Permissions: A list of staff members who can log in with this POS device. If you tap a staff member in this list, the POS displays a sublist of functions, with flags indicating if the staff member has permission to use each function.
Adjustments & Discounts: A list of adjustments and discounts available to tickets opened in this POS device. If you tap an adjustment or discount in this list, the POS displays a sublist of its details, such as its default amount and service charge.
Menu Groups: A list of menu groups available for order in this POS. If you tap a menu group in this list, the POS displays the schedules when the menu group is available.
Menu Items: A list of menu items available for order in this POS. If you tap a menu item in this list, the POS displays a sublist of its details, such as its tax status, kitchen group, associated tags, and size options.
Pricing: A list of pricing rules that are active and applicable to tickets opened with this POS. If you tap a pricing rule in this list, the POS displays a sublist of its details, such as its current status, its short identifier, and its tags.
General Screen
The General screen includes a list of controls that enable the manager to enable, disable, or modify various functions within the POS.
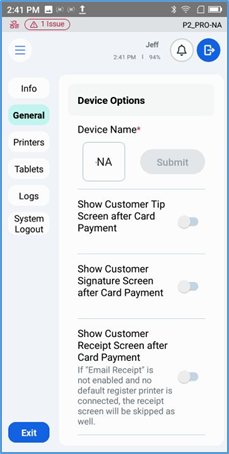
Device Options
Device Name: To set a name for the device, enter the name in the Device Name box, then tap Submit.
Show Customer Tip Screen After Card Payment: If you enable this switch, the POS will prompt customers to select a tip amount after they enter a credit card payment.
Show Customer Signature Screen After Card Payment: If you enable this switch, the POS will prompt customers to enter a signature in the Customer Signature screen after they enter a credit card payment.
Show Customer Receipt Screen After Card Payment: If you enable this switch, the POS will display the Receipt screen after they enter a credit card payment.
Waitlist: If you enable this switch, the POS will make the wait list accessible and visible in Table Layout screens.
Training Mode: If you enable this switch, the POS will run the POS in “training mode.” While running in training mode, the POS will not process any payments performed on it or synchronize its orders with other devices. Training mode enables staff in training to open tickets or perform payments without generating actual data in the location’s system files.
Verify Guest Count on Save: If you enable this switch, the POS will prompt servers to enter the number of guests on the ticket (if they have not already done so) when they save a new ticket.
Device Excluded Room(s)
The Device Excluded Room(s) section includes a list of the location’s rooms. If you select one or more of the rooms in this list, the POS will not allow staff members to access them or associate new tickets with them or their tables.
Staff Options
The Staff Options section includes only the Language control, which enables you to select which language the POS uses when displaying its labels and text.
Tab Room Ticket Sort
The Tab Room Ticket Sort section includes a list of options that enable you to set how the POS sorts tickets in the Ticket screens for tab rooms. You can set the POS to sort tickets by one of the following methods:
- Newest Tickets First (based on the time they were created)
- Oldest Tickets First (based on the time they were created)
- Alphabetical by Guest Name
Table Layout View
The Table Layout View section includes controls that enable you to select either Map View or List View as the default view mode when you access a room with a table layout. If you want the POS to automatically open rooms with table layouts in Map View by default, tap Map View, then tap Exit. If you want the POS to automatically open rooms with table layouts in List View, tap List View, then tap Exit. (By default, the POS uses the Map View mode when you access a room with a table layout.)
Auto Logout
The Auto Logout section includes a list of logout duration options. If you select a time option in this list, the POS will automatically log out if it is idle for the selected duration of time. You can select one of the following durations:
- 30 seconds
- 1 Minute
- 2 Minutes
- 5 Minutes
- 10 Minutes
- 1 Hour
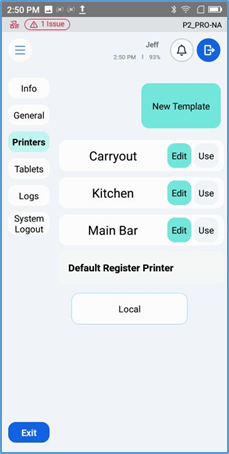
Printers Screen
The Printers screen, which enables you to configure the POS on each ELO device to use a specific default register printer. The POS requires a default register printer in order to print guest checks or use an attached cash drawer.
Tablets Screen
The Tablets screen enables you to add or edit the POS’s ticket prefix. A ticket prefix is a string of characters, up to four characters long, that the POS adds as a prefix to new ticket numbers. For instance, if you enter the letter “A” as a ticket prefix, the POS will add it as the first character of the ticket numbers it generates for new tickets created on its device (such as “A12”, “A13”, “A14”, and so on).
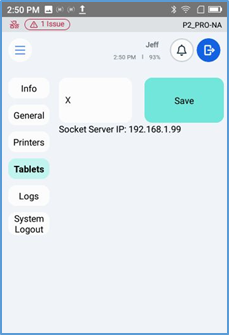
In the Tablets screen, you can set or edit the ticket prefix by entering a string of one to four alphanumeric characters in the Ticket Prefix box, then tap Save.
If you use ticket prefixes, you must use a unique prefix for each POS device. We recommend using alphabetical characters, to better differentiate the prefix from the numerical ticket number.
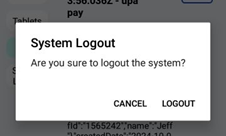
System Logout
If you tap System Logout, the POS will prompt you to verify that you want to log out of the POS app. If you tap Logout, the POS will log out.
Troubleshooting
The Handheld 2.5 device is displaying the “End of Day” screen.

- Swipe up on the device and tap.
- Tap the Genius tile.
The Genius app will display in the foreground.
Genius App displays a red icon in the POS.
If Genius displays this icon in the top panel of the POS, the device is not connected to the Dedicated Socket Server.
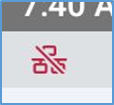
To fix this, verify that the device is connected to the same Wi-Fi network as the Dedicated Socket Server.
Also verify that the Dedicated Socket Server is on the Genius app and connected to the same network as the Mobile 2.5 devices.
HPOS is not updating to the latest JS Version


- Swipe up from the bottom of the screen, then tap.
- Swipe the Genius tile up to close it.
- Tap.
- Swipe up from the bottom of the screen.
- In the Apps screen, tap the Genius icon.
This will initiate a JS Version check and update.
If the device displays a blank white screen, the app is checking and attempting to install the latest version. Verify that the device is also connected to the location’s Wi-Fi network.
Note: Versions 2.16 and later will not include JS versions, only APK versions, and the app will display "Refresh App" where the JS version numbers used to display.
Network Unplugged/Terminal IP No Connection Erroror Download Error Terminal Code: 300 Cannot Connect
This error indicates that the device is not connected to the network, or it may be an error generated when Downloader tries to download a new update.
Verify that the device is connected to the network and try the download again. If the device connected to the correct network and you still see this error, do the following:

- Swipe down from the top of the screen, then tap the Settings icon.
- In the Password box, enter “Global99”.
- In the Settings screen, tap Wi-Fi.
- Tap and hold the network that the device is currently connected.
- Tap Forget Network.
- Reboot the device, access the Settings screen, and connect to the network again.
- Run the Downloader app again.